When most people think “home security system” they think of the professional-installed systems with monthly monitoring contracts, the technician who spends three hours drilling into walls, and the 24-month commitment that is impossible to exit. That model still exists — but in 2026 it is no longer the only option, or even the best one for most households.
DIY smart home security systems have reached a level of sophistication and reliability that makes professional installation unnecessary for the vast majority of residential properties. Wireless sensors, AI cameras, smart locks, and voice-controlled hubs can be configured to provide comprehensive monitoring in a single afternoon, for a fraction of the traditional cost, with no ongoing contract.
This guide walks you through everything — from understanding what a complete system actually needs to cover, to the exact setup process, to the common mistakes that leave obvious gaps in coverage.
1. What a Complete Smart Home Security System Actually Includes
A genuinely complete smart home security system covers four layers of protection:
Layer 1: Perimeter Detection (Outside the Home)
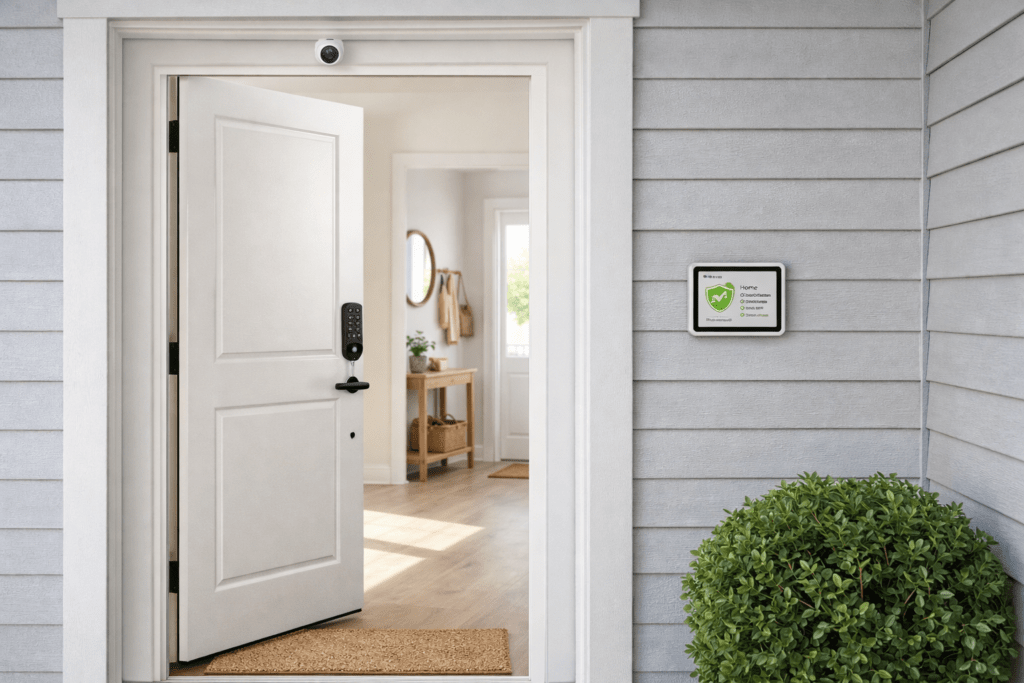
Outdoor security cameras at all entry points — front door, back door, garage, and side access. These detect and record anyone approaching before they reach the building. AI detection on these cameras means alerts are for people and vehicles, not false triggers.
Layer 2: Entry Point Control (At the Door)
Smart locks on front and back doors, video doorbell for the main entrance, and door/window sensors on all ground floor entry points. This layer detects and logs every door and window opening event with timestamps.
Layer 3: Interior Detection (Inside the Home)
Motion sensors in key interior areas and indoor cameras covering main entry points from inside. This layer catches intrusions that bypassed perimeter detection and provides documentation of interior access.
Layer 4: Monitoring and Response
Either professional monitoring (24/7 operator response) or self-monitoring via app alerts. Sirens or smart speakers that announce intrusion detection. Integration with smart home automations that can trigger additional responses.
Honest Perspective: Most households do not need all four layers immediately. Starting with Layer 1 (outdoor cameras) and Layer 2 (entry point sensors) provides the vast majority of security value at the lowest cost and effort. Layers 3 and 4 can be added progressively.
2. Professional Monitoring vs Self-Monitoring: Which Is Right for You?
| Factor | Professional Monitoring | Self-Monitoring |
| Monthly cost | $15-50/month | Free (app alerts only) |
| Response if triggered | 24/7 operator calls you | You receive app notification |
| Police dispatch | Operator can dispatch | You call yourself if needed |
| False alarm issue | Operator confirms first | No false dispatch risk |
| Works if phone dead | Yes — independent | No — needs your phone |
| Contract required | Often 12-24 months | None — cancel anytime |
| Best for | Vacation homes, elderly | Most residential households |
For most residential households with adults regularly at home or nearby, self-monitoring via app alerts is sufficient. The app notification arrives within 5-10 seconds of detection and you can view live footage and decide whether to call emergency services yourself. Professional monitoring adds genuine value for vacation properties, homes with elderly residents living alone, or households where the occupants travel frequently.
3. The Essential Components: What to Buy and in What Order
Build your system in this order — each layer adds immediate value while laying the foundation for the next:
Phase 1: Outdoor Cameras (Start Here)
Buy 2-3 outdoor AI cameras covering your front door, back access, and any side gate or garage. These provide the most immediate security value — footage of anyone approaching before they reach the building.
Recommended: Reolink Argus 4 Pro — 4K, solar powered, free AI detection, no subscription. Three cameras covering front, back, and side costs approximately $270-330.
Phase 2: Smart Lock + Video Doorbell
Replace your front door deadbolt with a smart lock (or add a retrofit lock) and install a video doorbell at the main entrance. This gives you remote door control and visitor identification.
Recommended: Schlage Encode Plus for permanent homes, August Wi-Fi Lock + August Doorbell Cam for renters.
Phase 3: Door and Window Sensors
Add contact sensors to every ground floor door and window. These are inexpensive ($10-20 each), battery powered, and provide instant alerts when any entry point is opened. For a typical home, 8-12 sensors cover all ground floor entry points.
Recommended: Aqara Door and Window Sensor — Matter compatible, works with Apple Home, Google Home, and Alexa.
Phase 4: Smart Hub and Integration
Tie everything together with a smart hub that allows cross-device automations. When a door sensor triggers at 2am, the outdoor camera starts recording, the smart lights turn on, and you receive an alert.
Recommended: Amazon Echo (4th Gen) or Google Nest Hub (2nd Gen) — both function as Matter controllers and Thread Border Routers, allowing all Matter devices to work together.
4. Step-by-Step Setup Guide
Before You Start
- Map your home and identify all entry points — every external door, ground floor window, and garage access
- Check Wi-Fi signal strength at each camera mounting location using your phone — areas with weak signal need a Wi-Fi extender before camera installation
- Decide your monitoring approach: self-monitoring (free) or professional service
- Download all manufacturer apps and create accounts before starting
- Charge or insert fresh batteries in all devices before installation
Day 1: Outdoor Cameras
- Mount cameras at planned locations using the bracket and screws provided — most outdoor cameras require a drill for the mounting bracket
- Run power cables to the nearest outlet for wired cameras, or confirm solar panels are positioned for maximum sun exposure
- Connect each camera to your 2.4GHz Wi-Fi network through the manufacturer app
- Configure AI detection settings: enable person and vehicle detection, disable basic motion detection
- Set up activity zones to exclude areas outside your property boundary
- Test notification delivery by walking into the detection zone and confirming alerts arrive within 10 seconds
Day 1: Smart Lock
- Remove existing deadbolt per the manufacturer instructions
- Install new smart lock deadbolt and interior assembly
- Connect to Wi-Fi through the manufacturer app
- Set up auto-lock (recommended: 1-3 minutes)
- Create unique access codes for each household member
- Test physical key, code entry, and app unlock with door held open before closing
Day 2: Door and Window Sensors
- Install sensors on all ground floor external doors and windows using the adhesive backing
- Connect each sensor to your hub (Alexa, Google Home, or Apple HomeKit) through the manufacturer app
- Test each sensor by opening the door or window and confirming the app shows the correct open/closed status
- Configure alert notifications for each sensor
Day 2: Automations
- Create a “Night Mode” routine: arm all sensors at midnight, alert immediately if any trigger
- Create an “Away Mode” routine: triggered when everyone leaves home, enables full monitoring
- Create an “Alert” automation: when a door sensor triggers while in Away Mode, turn on outdoor lights and start camera recording
- Test each automation by simulating the trigger condition
Important: Test every component and automation thoroughly before relying on the system. A security system you have not tested is not a security system — it is an expensive set of devices that may or may not work when needed.
5. The Best Smart Security Systems for 2026
#1 — SimpliSafe — Best Complete DIY Professional System |
SimpliSafe is the best option for households who want a professionally designed complete system without professional installation. The starter kits include a hub, outdoor camera, keypad, motion sensor, and door sensors configured to work together out of the box. Optional 24/7 professional monitoring at $9.99-$29.99 per month with no contract required.
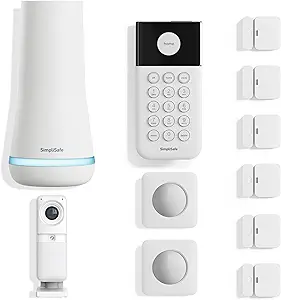
- Complete system designed to work together — no compatibility research needed
- Professional monitoring available with no contract commitment
- Fast police dispatch — SimpliSafe has direct agreements with local police in many areas
- Cellular backup ensures monitoring continues during internet outages
- Downside: ecosystem is relatively closed — harder to integrate with other smart home platforms
#2 — Ring Alarm — Best for Amazon Ecosystem |
Ring Alarm integrates most deeply with Amazon Echo and Alexa. The Ring app handles cameras, alarm, and doorbell from a single interface. Professional monitoring at $10/month. The expanding Ring device range means cameras, doorbells, indoor cameras, and sensors all appear in one ecosystem. The major limitation is cloud dependency — Ring cameras require a Ring Protect subscription for video history.
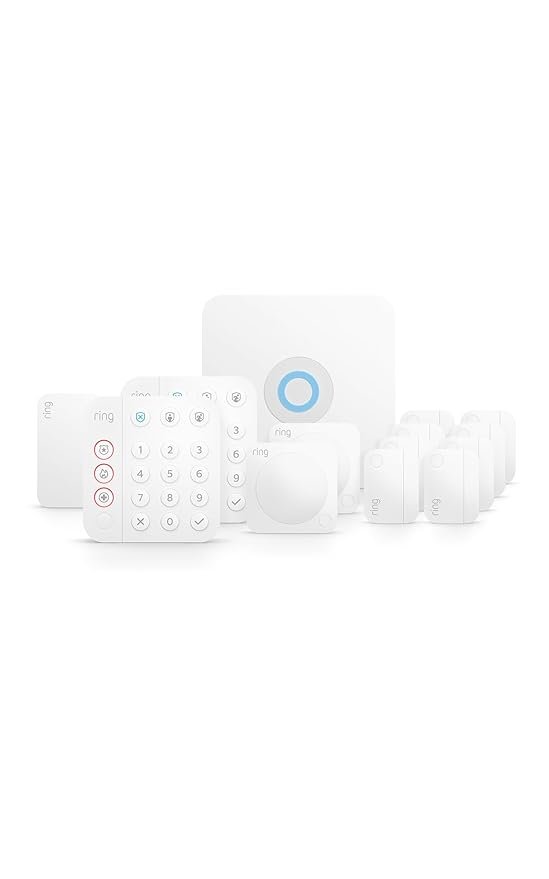
- Single Ring app for all devices — cameras, alarm, doorbell, sensors
- Deep Amazon Alexa integration
- Affordable professional monitoring at $10/month
- Wide range of compatible Ring devices
- Downside: camera video history requires paid subscription — no free local storage option
#3 — Aqara + Apple HomeKit — Best for Apple Households
For Apple ecosystem households, Aqara provides the most comprehensive Matter and HomeKit security device range at competitive prices. The Aqara hub connects via Matter to Apple Home, and the range of door sensors, motion sensors, cameras, and smart locks all appear natively in the Apple Home app. No monthly subscription required for core features.
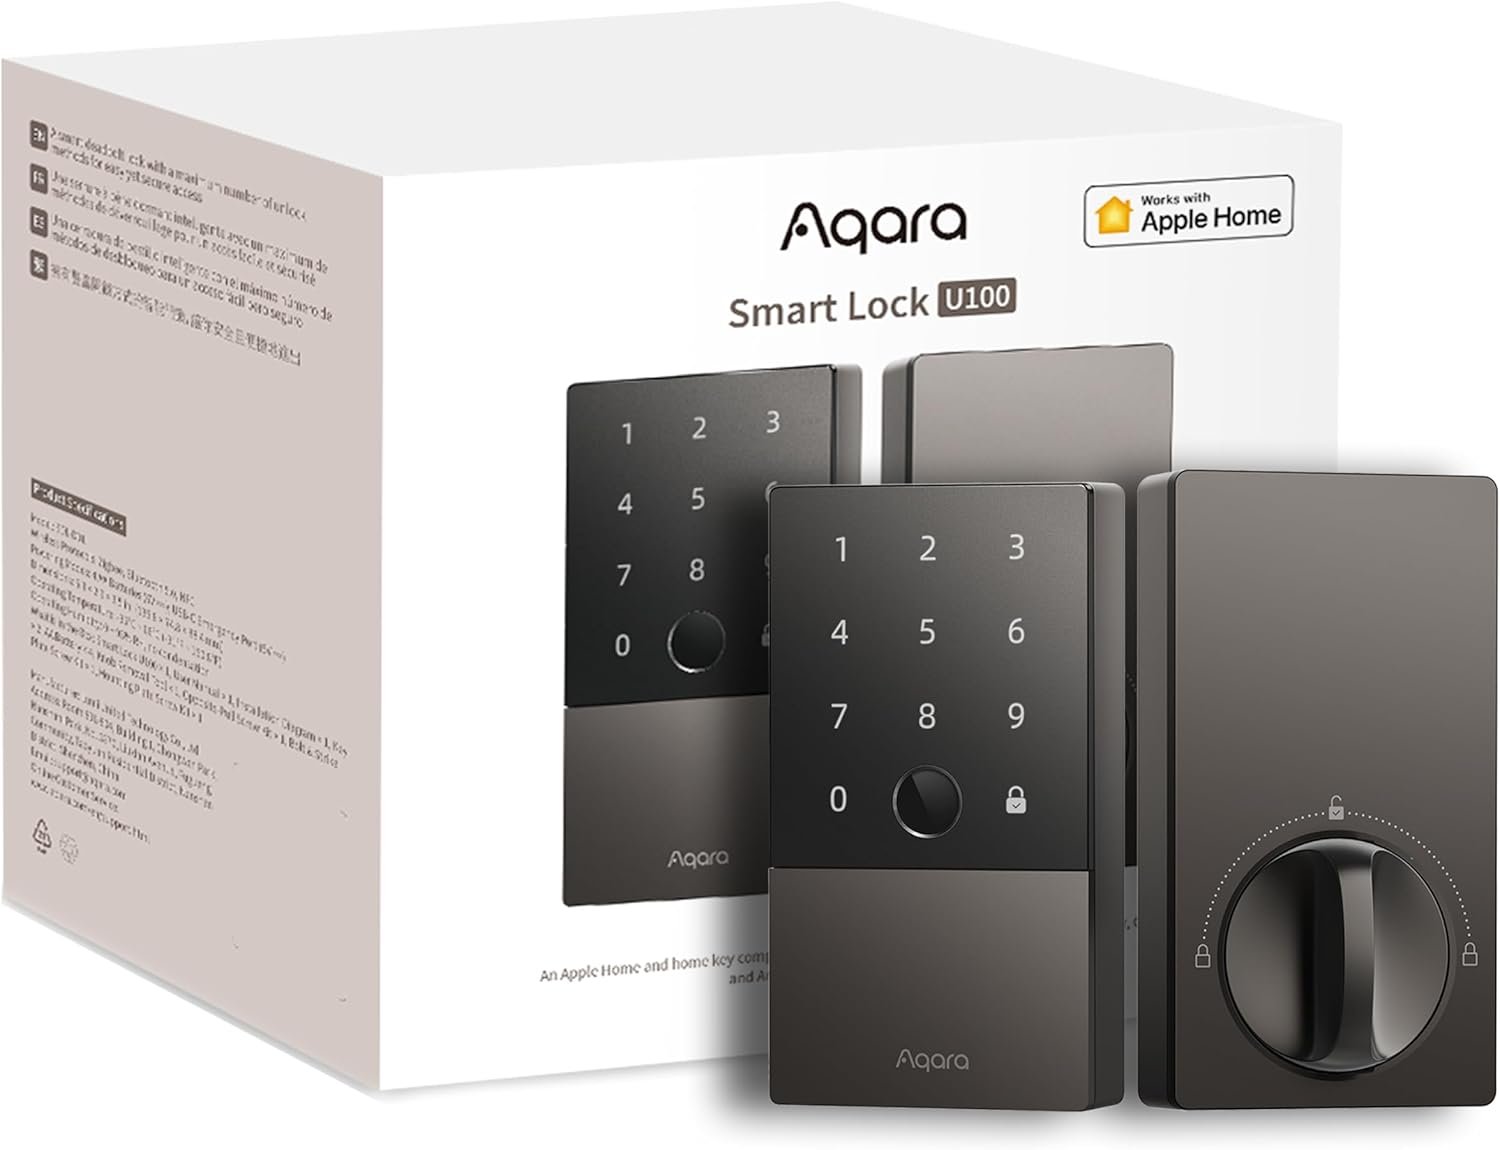
- Native Apple HomeKit integration via Matter — no additional apps needed
- No subscription required for core monitoring features
- Excellent range of sensors, cameras, and locks all Matter compatible
- Works with Alexa and Google Home simultaneously via Matter
- Downside: requires Aqara hub for some devices — additional hardware cost
6. How to Cover Your Entire Home With Minimal Devices
Strategic placement allows fewer devices to cover more area effectively:
- One camera covering the front of the house should angle to capture both the front door and the driveway approach — maximising the detection zone of a single device
- A back garden camera positioned at the corner of the house can cover both the back garden and one side of the property simultaneously
- A single indoor motion sensor positioned in a hallway between the front door and the main living area covers the most common intrusion path through the house
- Window sensors are more efficient than window cameras for ground floor detection — at $15-20 each versus $100+ for a camera, you can sensor every ground floor window for the price of one extra camera
- The garage is the most overlooked entry point in home security. A single camera covering the garage door plus a door sensor on the internal garage-to-house door provides complete coverage of this route
7. Integrating Security With the Rest of Your Smart Home
The real power of a smart security system emerges when it integrates with your other smart home devices:
- When a door sensor triggers while in Away Mode: outdoor lights turn on, cameras begin recording, and you receive a notification simultaneously
- When the smart lock is unlocked after 10pm: the hallway smart lights turn on automatically at low brightness — convenient and a visible deterrent from outside
- When you say “Alexa, good night”: all doors lock, all lights turn off, and the security system arms in one command
- When a camera detects a person at the front door: your smart doorbell plays a chime inside and the nearest Echo Show or Nest Hub displays the camera feed automatically
- When the smoke alarm triggers: all smart lights turn on at maximum brightness to aid evacuation
These integrations are configured through Alexa Routines, Google Home Automations, or Apple Shortcuts — all free, all configurable without any coding knowledge.
8. Common Mistakes When Setting Up Home Security
Focusing Only on the Front Door
The front door is the obvious entry point but not the most common one used by burglars. Research consistently shows that back doors and garage doors are the most common actual entry points. A camera on the front door with no coverage of the back of the property has a significant blind spot.
Not Configuring Activity Zones
A camera without activity zones covering a busy street will alert constantly on passing traffic, pedestrians, and cyclists — all irrelevant to your security. Configure activity zones to focus detection on your property boundary from the first day of installation.
Weak Wi-Fi Coverage at Camera Locations
Cameras installed at the perimeter of a property are often at the furthest point from the Wi-Fi router. Weak signal causes connection drops, delayed notifications, and degraded video quality. Test signal strength at each camera location before installation and add a Wi-Fi extender if signal is below 60% strength.
Not Testing the System After Setup
The most dangerous mistake. A security system with a disconnected sensor, a camera that stopped recording after a firmware update, or an automation that does not trigger correctly provides false confidence. Test every component monthly and after any app updates.
Sharing the Same Code With Everyone
Creating one household code and sharing it with everyone means no activity log accountability, no individual revocation capability, and no way to identify who accessed the property if something goes wrong. Create individual codes from day one.
9. Frequently Asked Questions
How much does a complete DIY smart security system cost?
For a typical 3-bedroom home, a complete DIY system covering all entry points costs $400-800 in hardware with no ongoing fees, or $300-500 in hardware plus $10-30 per month for professional monitoring. This compares favourably with professionally installed systems that typically cost $500-2,000 in installation fees plus $30-60 per month ongoing.
Do I need professional monitoring?
For most residential households where adults are regularly present or nearby, self-monitoring via app alerts is sufficient. Professional monitoring adds clear value for vacation properties, homes with elderly residents living alone, and households where everyone travels frequently. The option to add professional monitoring later (SimpliSafe and Ring both allow this) means you can start without it and add it if circumstances change.
Will my security system work during a power cut?
Battery-powered sensors and cameras continue operating during power cuts. Hub devices (Amazon Echo, Google Nest Hub) require power and go offline during outages. Professional monitoring systems like SimpliSafe include cellular backup that operates independently of both power and internet. For self-monitored systems, consider a UPS (uninterruptible power supply) for your router and hub to maintain connectivity during brief power cuts.
Can I take my security system when I move house?
DIY systems are designed to be portable. Wireless sensors remove without damage. Cameras unmount from their brackets. Smart locks uninstall in under 30 minutes. The entire system can move with you to a new property. Professionally installed systems, by contrast, are typically left in the property.
How do I prevent false alarms?
Configure activity zones to exclude public areas. Use AI detection rather than basic motion detection. Position cameras to avoid areas with regular predictable movement (trees, flags, busy roads). Set appropriate detection sensitivity for the environment — a camera facing a quiet private garden needs higher sensitivity than one facing a busy driveway.
Is a DIY system as effective as a professionally installed system?
For camera quality, sensor reliability, and smart home integration, DIY systems in 2026 match or exceed professionally installed systems at the same price point. The main genuine advantage of professional installation is the assessed placement — an experienced installer knows where cameras and sensors provide optimal coverage for your specific property layout. This knowledge gap can be closed by following a systematic placement plan like the one in Section 6 of this guide.
How do I secure my cameras from being hacked?
Use a strong unique password for every camera account — not the same password you use for other services. Enable two-factor authentication on every manufacturer account that offers it. Keep camera firmware updated — manufacturers regularly patch discovered vulnerabilities. Consider placing cameras on a separate IoT Wi-Fi network isolated from your main devices.
10. Our Recommended Starter Setup
For a typical 3-bedroom semi-detached or detached home, here is the starter setup that provides genuine comprehensive coverage at a practical budget:
| Device | Quantity | Est. Cost | Purpose |
| Reolink Argus 4 Pro | 3 | $270-330 | Front, back, and side coverage with 4K AI detection |
| Smart lock (Schlage or Wyze) | 1-2 | $90-250 | Front door keyless entry and auto-lock |
| Aqara door/window sensors | 8-10 | $120-200 | All ground floor doors and windows |
| Amazon Echo (4th Gen) | 1 | $90-100 | Matter hub and Thread Border Router |
| Total | — | $570-880 | Complete Layer 1-4 coverage |
This setup provides 4K outdoor AI detection at all entry points, smart lock access control, instant alerts on every door and window opening, and unified control through Alexa. Add professional monitoring through Ring Alarm or SimpliSafe at any time by adding their hub to the existing setup.
Build Phase 1 (cameras) first. Live with it for two weeks. Add Phase 2 (smart lock) when you are ready. Add Phase 3 (sensors) at the next opportunity. A complete security system built in stages is more effective than a complex system installed all at once and never fully configured or understood.
You Might Also Like

Priya holds a background in cybersecurity and brings a technical eye to every camera, doorbell, and smart lock review, specializing in privacy and encryption.
All articles by Priya →